You don’t need a season-long project to change how the front of your house looks from the street. Most of the impact in a front yard comes from a short list of jobs you can knock out in two days — and the trick is doing them in the right order so each step sets up the next.
Here’s the plan: Saturday to clear and define, Sunday to plant and finish. By Sunday evening you’ll have a real before-and-after.
Before You Start: The 20-Minute Prep
Walk the yard and write one shopping list before you do anything else — so you’re not driving back to the store mid-project when your hands are dirty and you’re losing daylight.
For a typical small front yard you’ll need:
- 5–7 bags of dark mulch
- A few one-gallon plants in two or three varieties
- Two matching pots for the entry
- A pack of solar stake lights
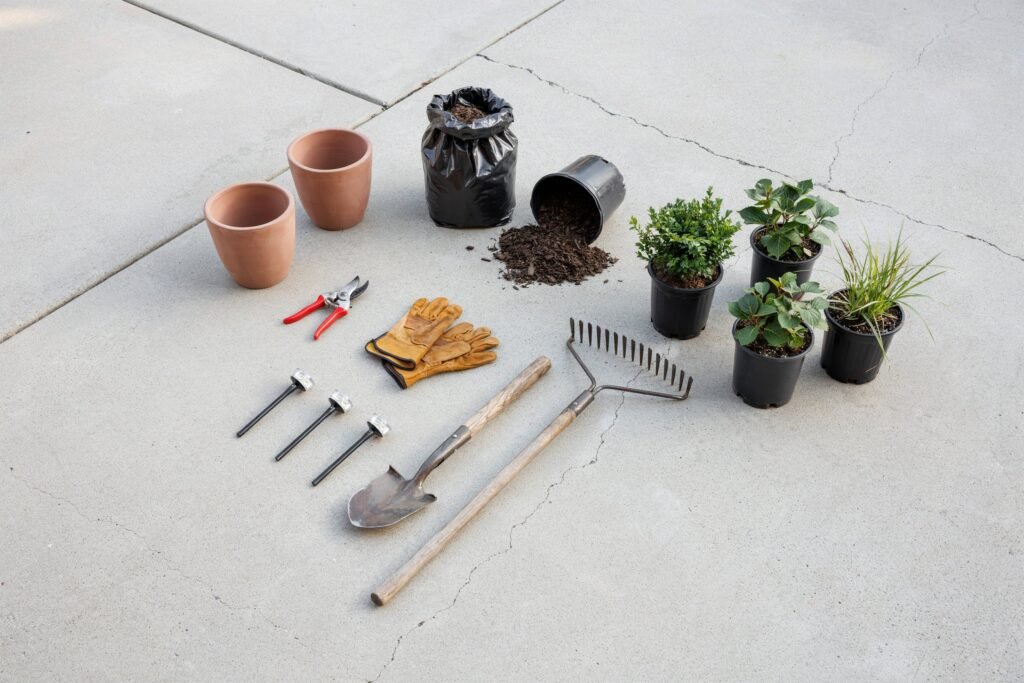
Tools: a flat spade, hand pruners, a rake, and gloves.
Pick everything up on Friday evening or Saturday morning so both days are spent working, not shopping.
Saturday Morning: Clean and Cut Back
This is the unglamorous day — and it’s the one that matters most. You genuinely cannot make a front yard look good until it’s clean and the shapes are defined. Everything else is built on top of this foundation.
Start with three things:
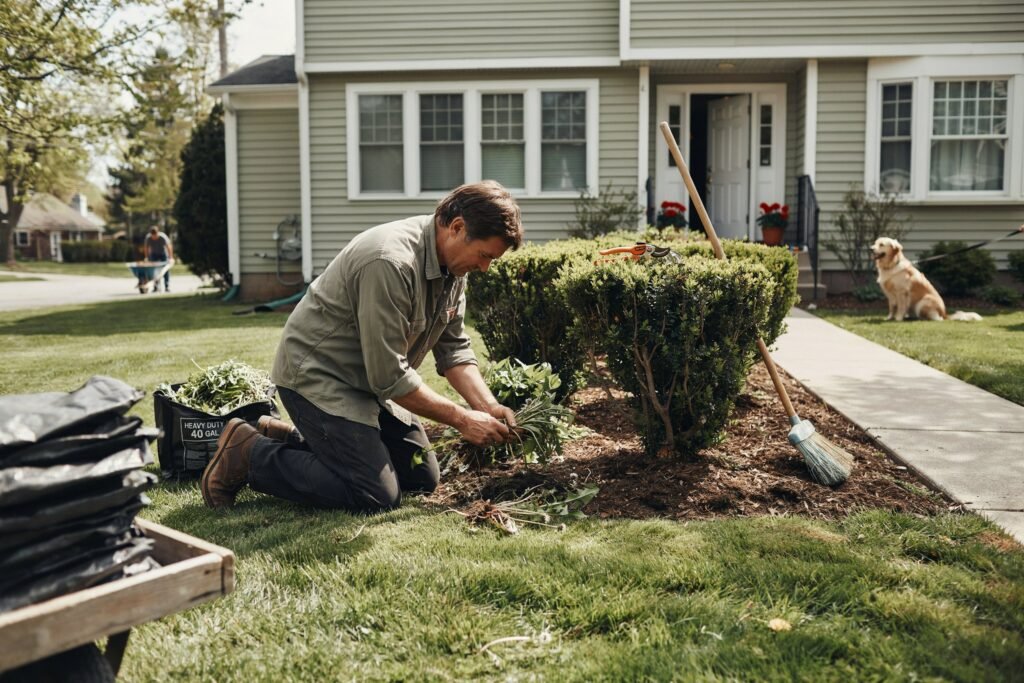
Weed the beds. Pull everything that shouldn’t be there. This alone makes the yard look more cared-for before you’ve added a single plant.
Sweep the walkway and driveway edges. Grime, moss, and accumulated debris along hard edges make a yard look neglected even when the plants are healthy. A stiff broom or a quick pressure wash makes an immediate difference.
Cut back overgrown shrubs. This is the single biggest thing that makes a front yard look tired and forgotten — shrubs that have grown shapeless and are swallowing the front of the house. Take your hand pruners and shape existing shrubs into clean, intentional forms. Bag all the debris.
By the time you break for lunch the yard will already look significantly better, and you haven’t planted a single thing yet.
Saturday Afternoon: Edge the Beds
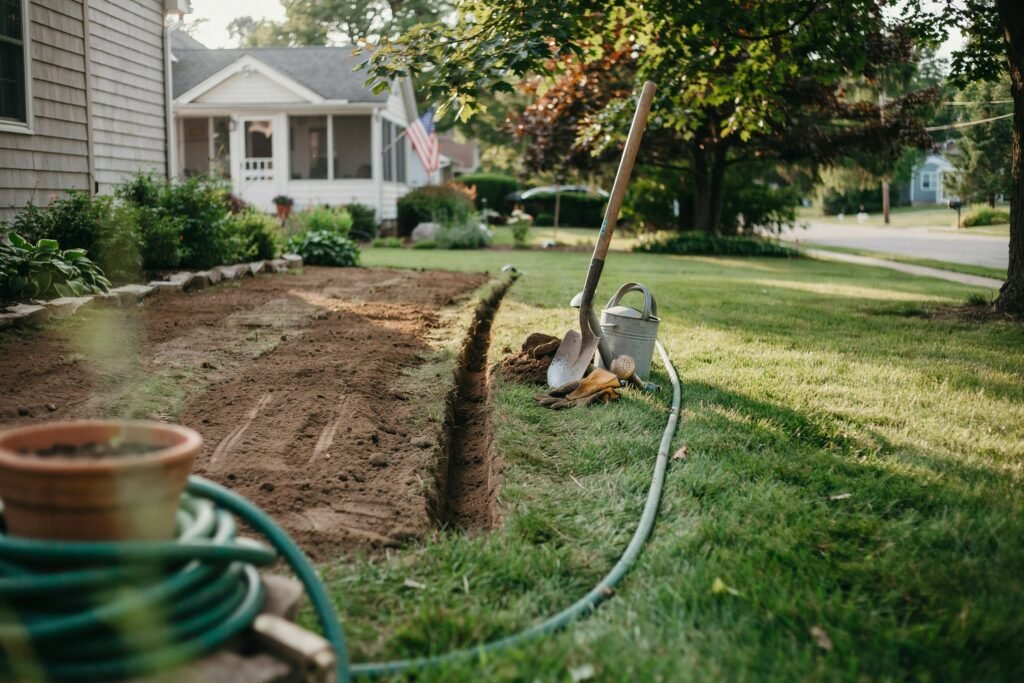
Edging is the step most people skip, and it’s the one that makes everything else look professional rather than amateur.
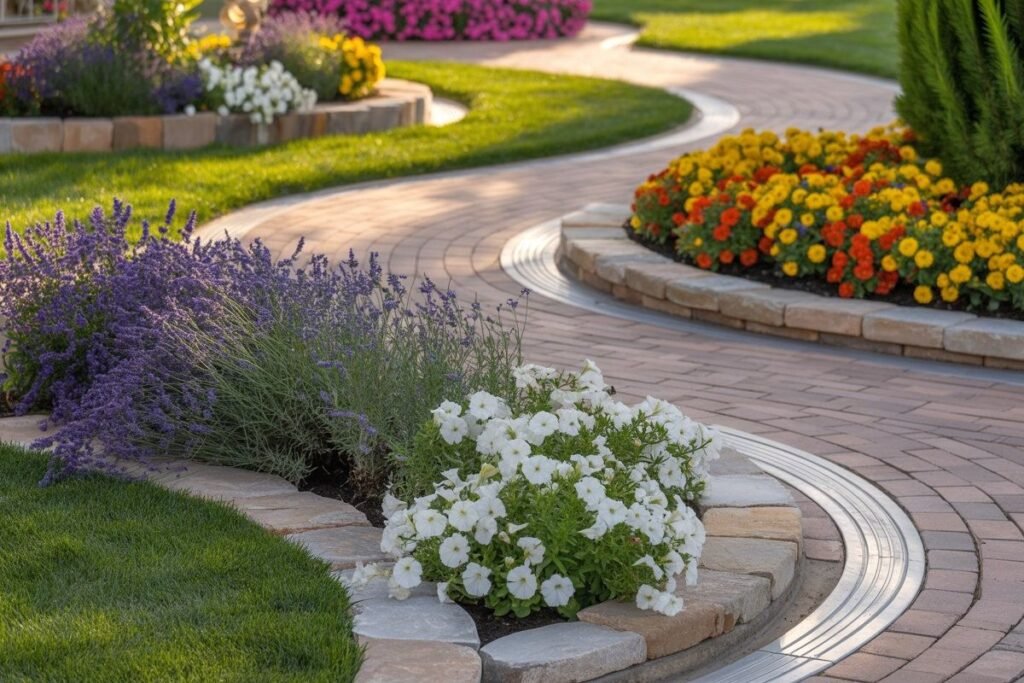
Lay a garden hose on the ground to mark a clean, gently curving line where each bed meets the lawn. Adjust it until the curve looks natural and flows well from the street. Then cut a shallow V-trench along that line with your flat spade.
This crisp edge is what will make every plant and every bag of mulch you add tomorrow look intentional and designed. Without it, even expensive plants in fresh mulch look like they were just dropped in randomly.
Don’t mulch yet — that comes tomorrow, after the planting is done. End the day by watering the beds if the soil is dry so it’s easy to dig into on Sunday morning.
Sunday Morning: Plant in Groups
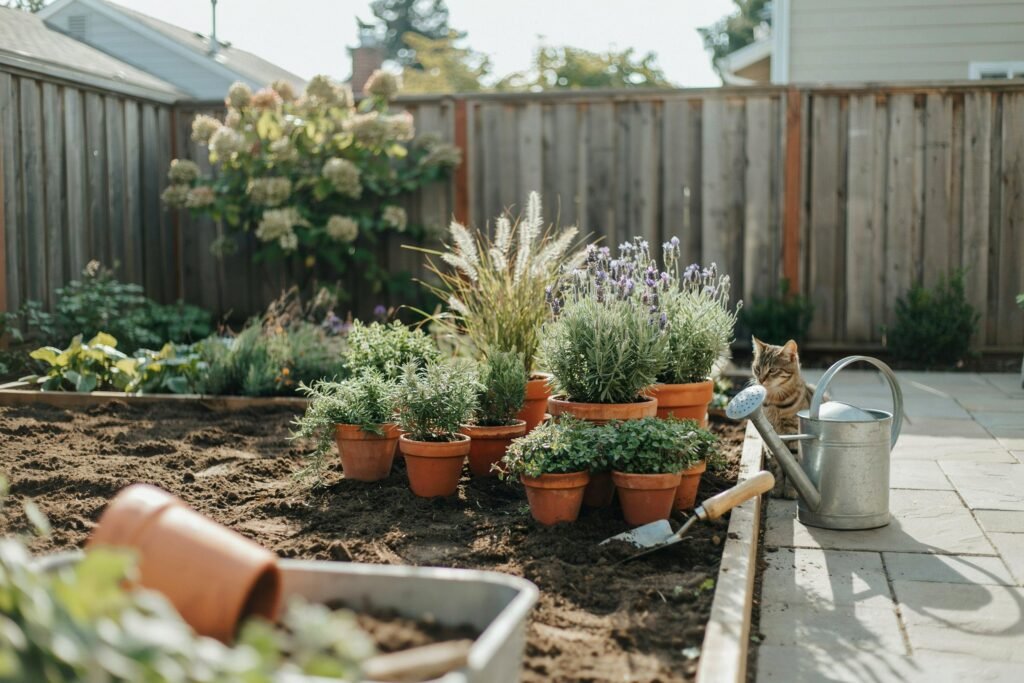
Now the satisfying part — on top of a clean, defined canvas.
Before you dig a single hole, set all your plants out in their pots and move them around until the arrangement looks right. The layout rules that work every time:
- Taller plants toward the back or center, lower plants in front
- Group plants in threes or fives rather than spacing them evenly in a line
- Cluster the same variety together rather than alternating single plants
That last point is the one most people get wrong. Planting in clusters of the same variety — three of one plant, five of another — is what makes a modest number of plants look like a designed garden. Single plants alternated across a bed look scattered and unintentional no matter how nice the individual plants are.
Once you like the layout, only then start digging. Plant everything, firm the soil around each root ball, and water each one in as you go.
Sunday Midday: Mulch Everything
This is the step that ties the whole project together — and it’s deeply satisfying.
Spread dark mulch two to three inches deep across all the beds. Pull it back slightly from plant stems so it’s not touching them, and keep it away from the house foundation. Dark mulch behind a freshly cut edge is the look you’ve been building toward all weekend. It makes the bed look finished, suppresses weeds, holds moisture, and makes every plant in the bed pop by contrast.
Don’t skimp on depth here. A thin, patchy layer of mulch looks almost worse than no mulch. Two to three inches is the target across the entire bed.
Sunday Afternoon: The Entry and the Accents
The finishing touches take about an hour and deliver a disproportionate amount of the total visual impact.
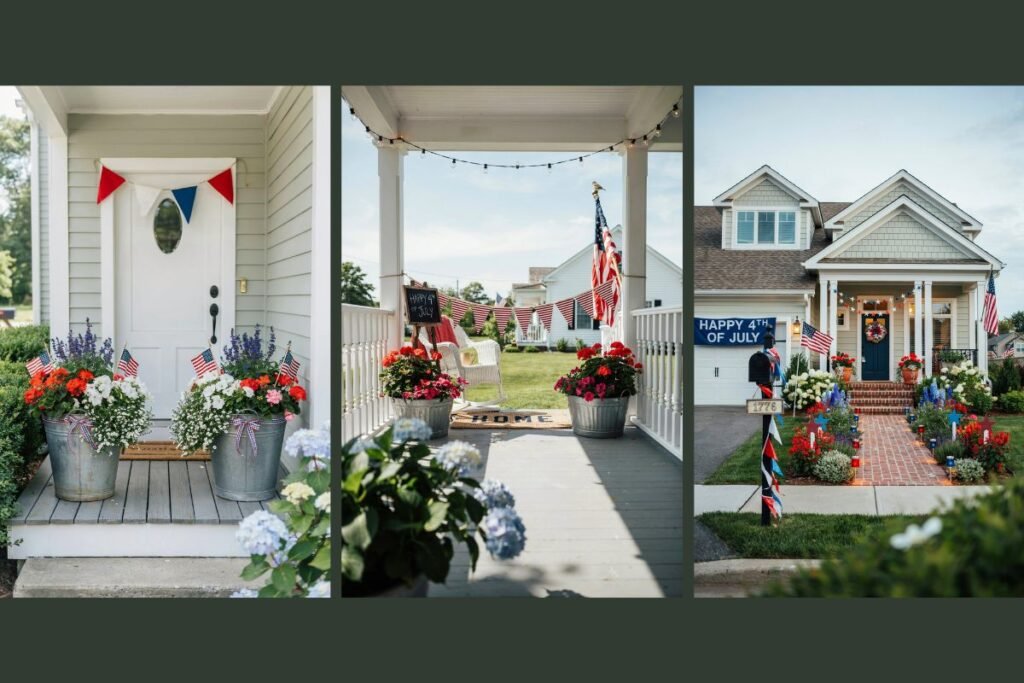
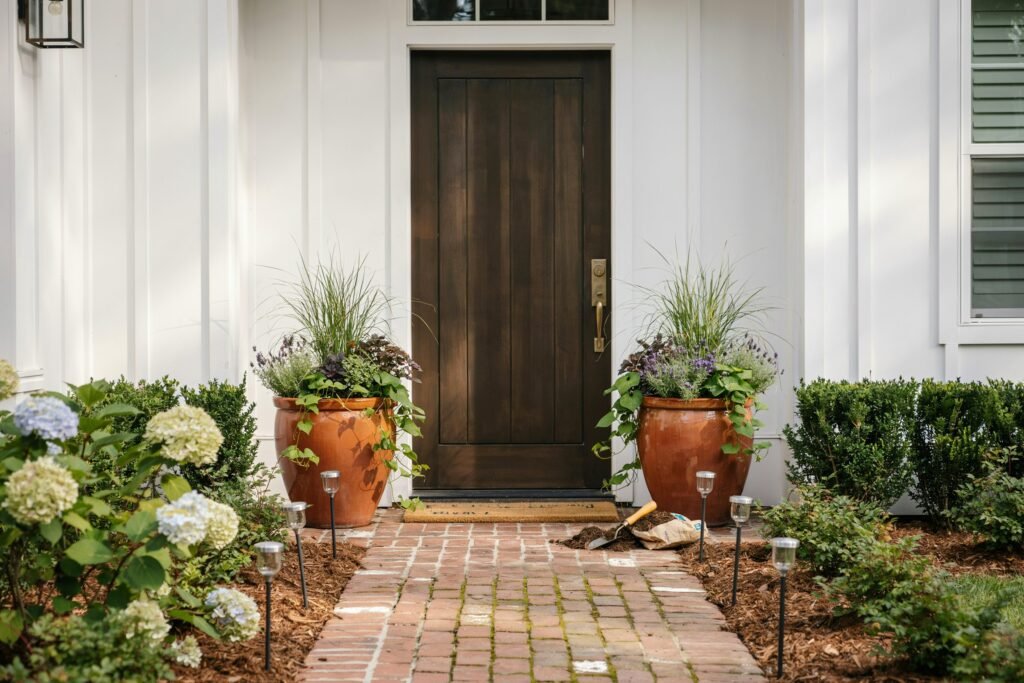
Plant the entry pots. Place a matching pair of pots on either side of the front door and plant them up. Use the thriller-filler-spiller approach if you want a full, professional look — one tall plant in the center, mounding plants around it, and something trailing over the edges. Matching pots on either side of the door create symmetry that frames the entry and makes the whole facade feel more polished.
Place the solar lights. Push solar stake lights into the beds or along the walkway at even spacing. They charge during the day and come on automatically at dusk — no wiring, no electrician, no ongoing cost. Seeing them light up for the first time Sunday evening is one of the best parts of the whole project.
Plants That Make This Easy
Choosing the right plants is the difference between a front yard that looks great all season and one that needs constant babysitting. For a weekend project, you want plants that:
- Are suited to the light your front yard actually gets (full sun, part shade, or full shade)
- Are hardy in your climate zone
- Require minimal watering once established
For full sun: lavender, ornamental grasses, black-eyed Susans, salvia, or knock-out roses. All are tough, low-maintenance, and look great from the street.
For part shade: hostas, astilbe, coral bells, or impatiens. These thrive without direct sun and stay lush all season.
For full shade: ferns, caladiums, or begonias. Rich foliage that makes shady spots look intentional rather than neglected.
Stick to one-gallon plants. They’re cheaper, lighter to handle, easier to plant, and they fill in faster than you’d expect. A $5 one-gallon plant becomes a full, established specimen within one growing season.
The Rules That Keep This a Weekend Project
A few principles that prevent a two-day project from becoming a three-weekend ordeal:
Focus only on what faces the street. The beds along the front of the house and the entry are where all the curb appeal lives. The side yards and back yard can wait.
Don’t try to fill every gap. Negative space is part of good garden design — you don’t need to pack plants into every inch of the bed. A few well-spaced, well-grouped plants in fresh mulch looks far better than a crowded bed of mixed varieties.
Buy small and plant close. One-gallon plants spaced appropriately for their mature size will look full within one season. Resist the urge to buy larger plants to fill space faster — the price difference is significant and the establishment advantage is minimal.
Stop when it looks good. There’s always more you could do. The goal is a genuine improvement, not a perfect yard.
The Sunday Evening Payoff
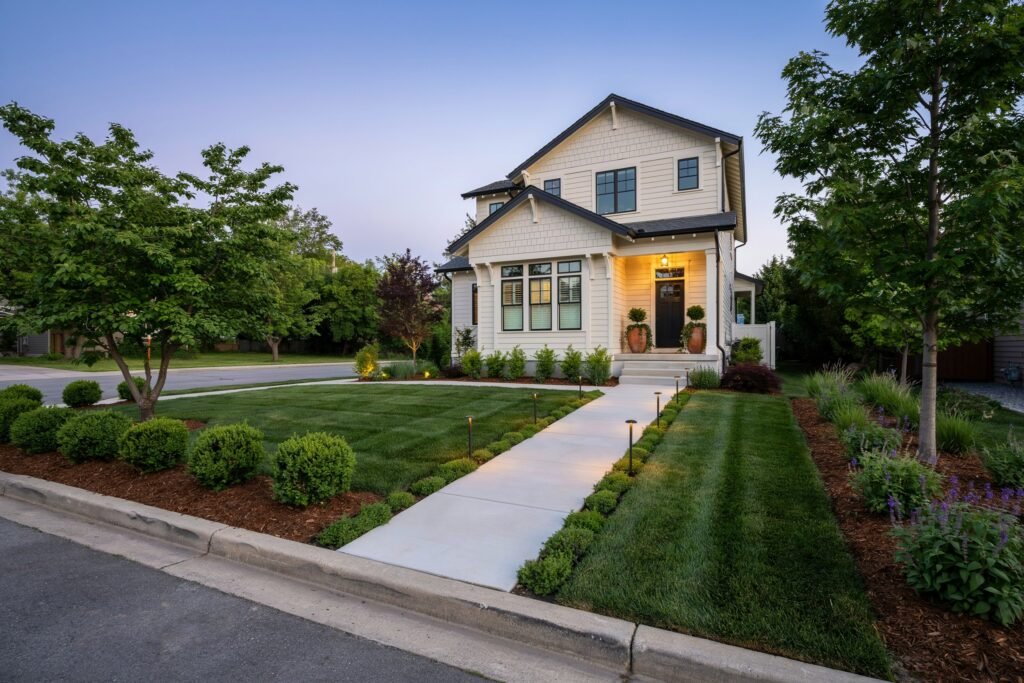
Stand at the curb where everyone else sees your house from. A clean edge, fresh dark mulch, a few well-grouped plants, two full pots at the entry, and lights coming on at dusk — that’s a genuine transformation from two days of focused work, with no contractor required.
The reason it works isn’t the plants or the pots. It’s because you started with the cleanup and the edging. Those two things are what make everything else look cared-for — and “cared-for” is the real secret behind every front yard that catches your eye from the street.
FAQs
What are the most impactful front yard changes you can make in a weekend?
Edging the beds, laying fresh dark mulch, cutting back overgrown shrubs, and adding a matching pair of planted pots at the entry. These four things together create the biggest visible change for the least time and money. The edging and mulch alone — with no new plants at all — can make a front yard look completely different.
How many plants do I need for a small front yard makeover?
Far fewer than you think. For a typical small front yard, 6–12 one-gallon plants in two or three varieties is usually enough — grouped in clusters of three or five rather than spread individually across the bed. It’s the grouping that makes them look like a design decision rather than random additions.
What mulch color looks best in a front yard?
Dark brown or black mulch. It contrasts most clearly with plant foliage and green lawn, makes colors pop, and gives beds a clean, finished appearance. Light or reddish mulch can look dated and draws attention to itself rather than to the plants.
How do I keep a front yard looking good after the weekend project?
The maintenance comes down to three things: pull weeds before they establish (five minutes once a week is enough), water new plants consistently through their first season until they’re established, and re-edge and top up mulch once a year each spring. Beyond that, a well-planted front yard with hardy, climate-appropriate plants largely takes care of itself.
Is it worth hiring someone for front yard landscaping or should I DIY?
For the scope of a weekend makeover — edging, mulching, and planting — DIY is absolutely worth it. The skills required are minimal, the tools are basic, and doing it yourself costs a fraction of what a landscaper charges for the same work. Save the contractor budget for projects that require equipment or expertise you genuinely don’t have, like grading, irrigation, or large tree work.